Source Control / Version Control
In these notes we will introduce Git as a version control system.
Version control or source control allows us (among other things) to be able to know what our project looked like at any point in time, e.g. last year, by keeping track of all the changes we've made to files over time.
- Stores files and their history
- Tracks changes to files over time
- Allow for point in time recovery and comparison
- Allows more than one person to work on (or examine) the same file at the same time.
Distributed Version Control
Git is a very common version control tool that you'll almost certainly come across in your career.

Git is a distributed version control system. The code is saves on multiple machines, and every user has a copy of the entire history of the project on his or her own computer.
Specifically:
- Remote: The main machine that hosts the project.
- Local: Personal machine of a user.
GitHub.com is the remote that we will use.
Solo Projects
For small solo projects, this usually means that there is a copy of the project on:
- Your local (personal) machine
- github.com
Collaborative Projects
For collaborative projects, this usually means that there is a copy of the project on:
- Your local (personal) machine
- The machines of your teammates / coworkers
- github.com or another remote host server
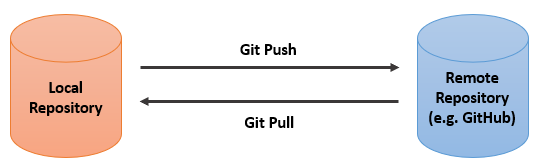
Synchronizing Changes via Git
Changes made on a local machine are not automatically reflected on the remote repository.
Likewise, changes made on the remote repository (e.g. by a teammate) are not automatically reflected on a local machine.
Remote to Local Synchronization
Creating a New Repository
The easiest way to create a new repository is via the GitHub website. You can set the visibility and the name of the repository. Both can be changed later.
Cloning a Repository
git clone https://github.com/[username]/[repository_name].git
When we want to create a local copy of a remote repository, we use the
git clone command.
We can use this to:
- Create a copy of someone else's work
- Create a local copy of our own project
You can find the URL to clone a repository by clicking the green "Code" button on the repository page and copying the URL.
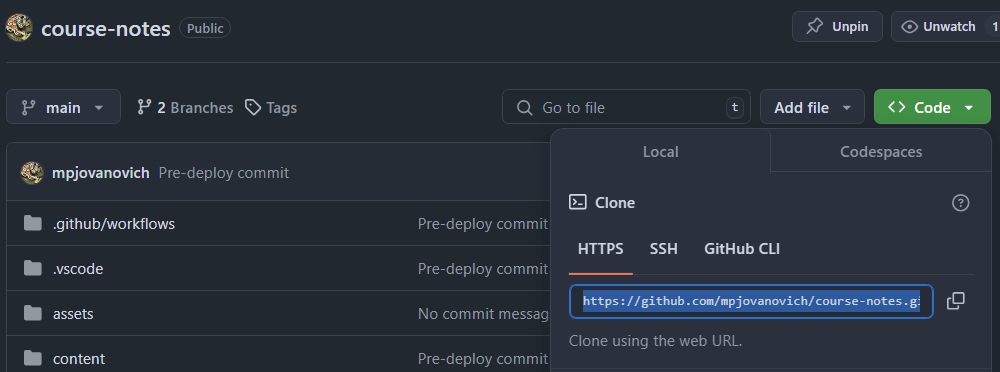
Steps to clone a repository:
- Navigate to the repository page.
- Click the green "Code" button.
- Copy the URL.
- In your terminal, change to the directory where you want to clone the repository. It will create a subdirectory with the name of the repository.
- Run the
git clonecommand with the URL.
Note: In this course we use GitHub Classroom to create repositories, so you won't need to do this manually; however you should know how to do this if you work in the field of computing.
Pulling Changes
git pull
After you have cloned a repository, you need a way to keep it up to date
with the remote repository. For this we use the
git pull command.
This is always a good idea to do before you start working on the project to make sure that your local copy is up to date, especially if:
- You're working in a team.
- You're working from multiple computers that each have their own copy of the repository (e.g. home and work).
Here we will:
- Create a new repository
- Clone it to our local machine
- Make some changes using the GitHub website
- Pull the changes down to our local machine
Local to Remote Synchronization
Getting our changes from the local machine to the remote machine is a little more complicated, but becomes easy once you understand the way that Git works.
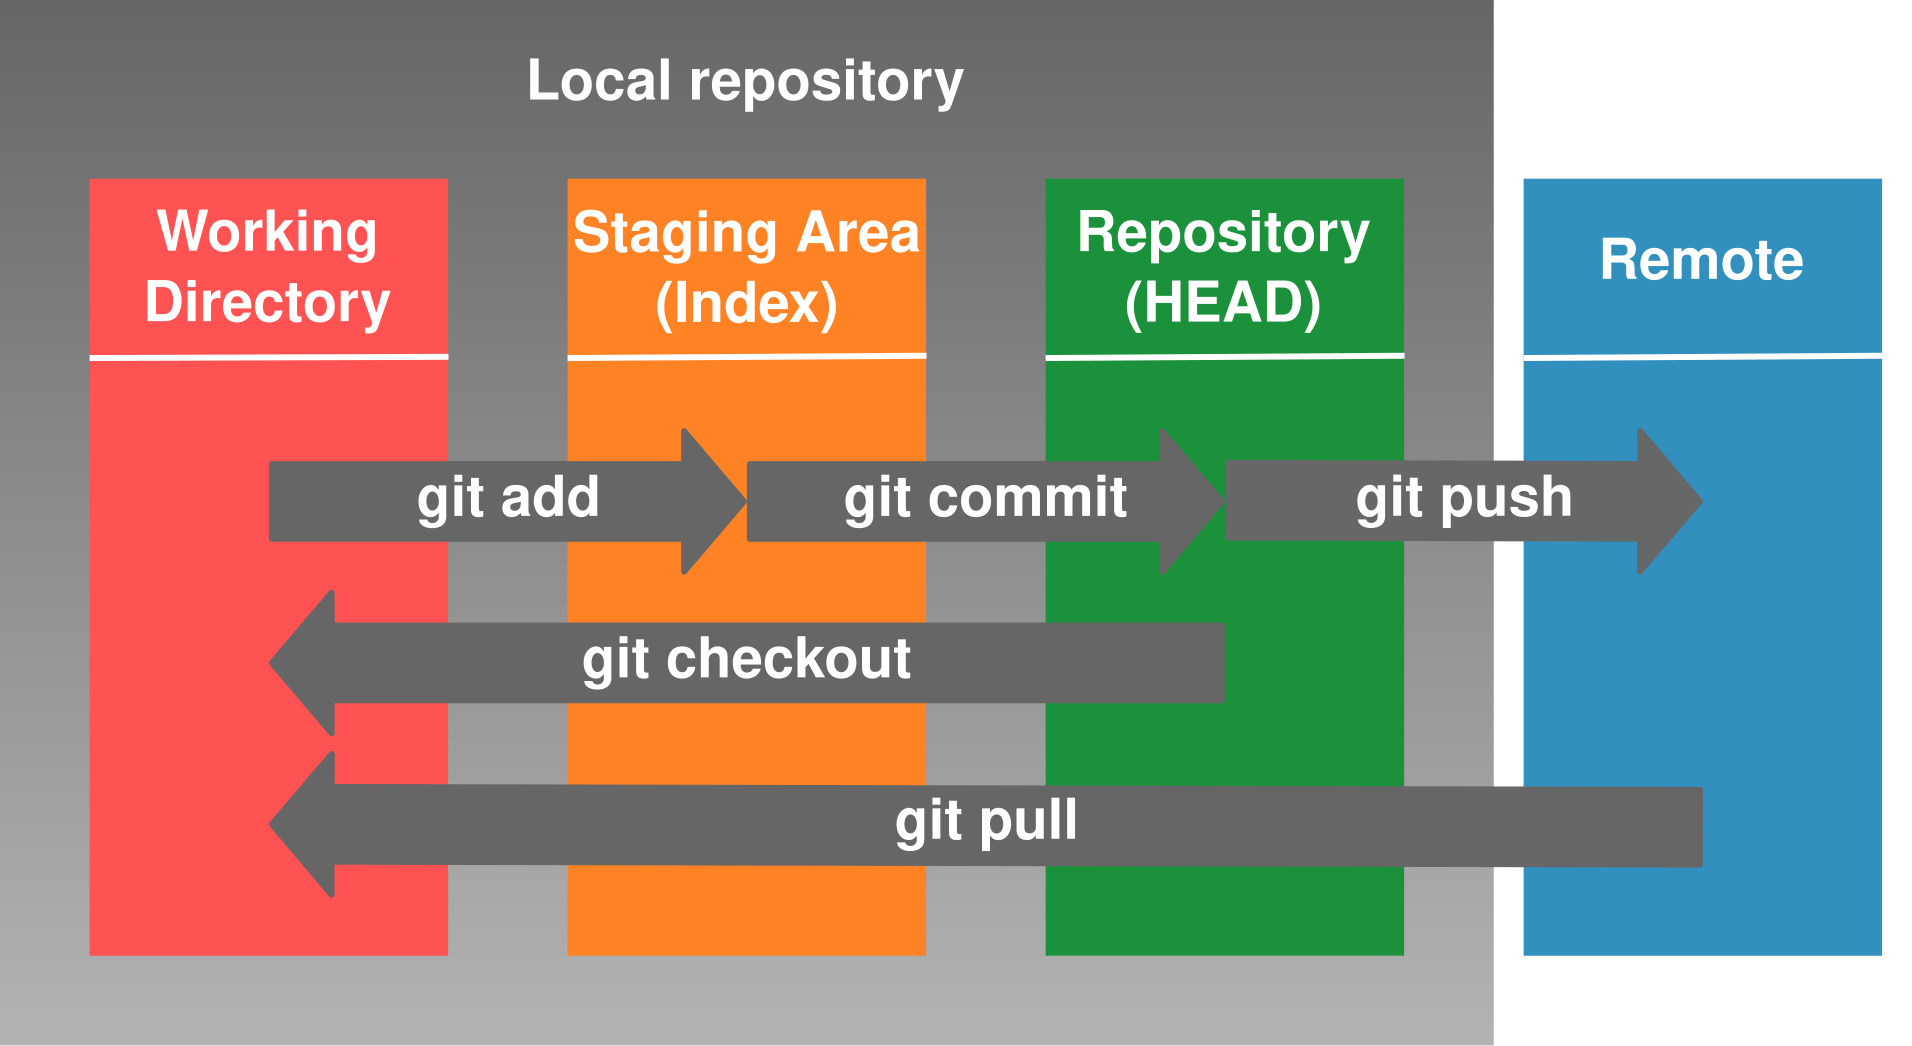
We can think of files that are tracked by Git as being in different "areas".
Working Directory
All of the files that you are currently working on comprise your working directory. Saving files here does not automatically track the changes with Git.
Staging Area
git add [file_name]When we want to commit changes to the repository, we first add the files that we want to commit to the staging area. Changes in the staging area are tracked by git but are not yet in the local repository.
The purpose of the staging area is to allow you to group one or more changes together before committing them to the local repository as a single unit.
To add a file to the staging area, we use the
git add command:
Local Repository
git commit -m "[commit_message]"The files in the local repository are the ones that have been committed. This does not mean that the files have been pushed to the remote repository.
To commit the changes in the staging area to the local repository, we
use the
git commit command.
This command requires a message to be provided between quotes. For starter personal projects this may not seem important, but it's best practice to provide a brief but concise message describing the changes that were made. The messages are used to quickly identify the changes when looking back at the commit history.
Remote Repository
git pushFinally, we need to push the changes from the local repository to the remote repository. It's usually best to do this immediately after committing the changes to the local repository.
Here we will:
- Modify an existing file in the repository
- Add a new file to the repository
- Commit the changes to the local repository
- Push the changes to the remote repository
*We will look at how to check what files are in what state in the next section.
File States
Each file that is tracked by Git can be in one of four states, which roughly correspond to the areas that we discussed earlier:
Unmodified:
The file has not been modified since it was last committed.
Modified:
The file has been modified but not yet added to the staging area.
Staged:
The file has been added to the staging area but not yet committed.
Committed:
The file has been committed to the local repository (at which point is is again "unmodified").
Here we will:
- Modify an existing file in the repository and save it on the file system
-
Check the status of the repositoryusing
git status - Commit the changes to the local repository
-
Check the status of the repository using
git status - Push the changes to the remote repository
-
Check the status of the repository using
git status